Above is my OCAC work table at the end of a productive dyeing day. Below, another shot of my area on Sunday afternoon, as the workshop was winding down.

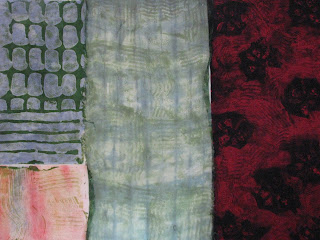
Below are a few more examples of the liquid resist work I did there. The small pinky square in the lower right was a nondescript scrap I'd painted at some point with acrylics. Daubed with potato dextrin and brushed with green dye, it's marginally more interesting. The middle piece is organza that I'd indigo shibori-ed in a previous workshop, now given the potato dextrin treatment and a coat of the same green dye. You can see a lot more detail, of course, if you click to enlarge the photos.

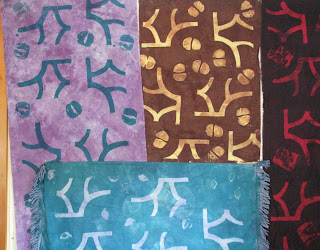
Despite my infatuation with potato dextrin, I was pleased with some of my results using other techniques. For instance, I marked several pieces of cloth with this silkscreen design (below), plus some random stamping here and there. First I re-cut the stencil I'd used in a previous workshop with Jeannette; this time, instead of putting thickened bleach through the screen to remove color, I used thickened dye -- putting color on, instead of taking it out. I also used the same stencil with a corn dextrin resist, rolling thickened dye over it later. When I washed out the resist, the stenciled form appeared in the color of the original fabric.

The horizontal blue piece at the bottom is an antique dresser scarf that was originally white. I dyed it in the same indigo workshop as the organza up above, with similarly blah (a.k.a. "very subtle") results. It was buried under books on Jerry's bedside table until last week, when I reappropriated it for my workshop stash.
It was big fun playing with the various silkscreening permutations. In the process, I also created some lovely patterns on the dropcloth:

Painting with dyes, especially on damp fabric, is a much freer and more improvisational process. Applying the dye with a syringe instead of a brush turned it into a Jackson Pollock-y process: keep moving, don't hesitate or ponder; work fast but gracefully. You can pause between colors to decide if it needs more. Now I know how those expensive "designer" sweatshirts I used to covet at Noma in Gualala are done.

The grid pattern on the lower left was done by laying a piece of patterned plastic under the fabric, then rolling over it with a dye-laden (but not too laden, I eventually came to realize) foam roller.
Yes, those are cut-up jeans at the top left. I didn't buy an inch of new fabric for this workshop. Everything is either overdyed commercial fabric or yardage I'd previously dyed myself. The dark-red material appearing here and there used to be the lining for the striped velour drapes that Jerry sewed (!) for the bedroom and living room of the first house we bought in the Bay Area. We still have a pair in our bedroom here.


2 comments:
Just one correction!! you did not put thickened bleach through the screen - it was thickened thiox - better known as discharge paste. You could use bleach and risk damaging the fabric, but we die not use it in that class. I love your squiggly pieces.
Thanks! Yeah, I know it was thiox, but the half dozen friends who read this blog and aren't quilt artists or surface design people would roll their eyes and stop reading. So I went for the generic. Thiox bleaches, in effect, but is not household bleach.
Post a Comment